Back

DIY EV charging with solar panel integration using Home Assistant

05/09/2026 · 14 min

Last summer, my house spent its afternoons giving electricity away. The panels produced more than we could use, the meter ran backwards and nothing useful happened with that energy. This is the story of how I fixed that without buying a battery — and how the system is put together, with enough detail for someone to repeat it.

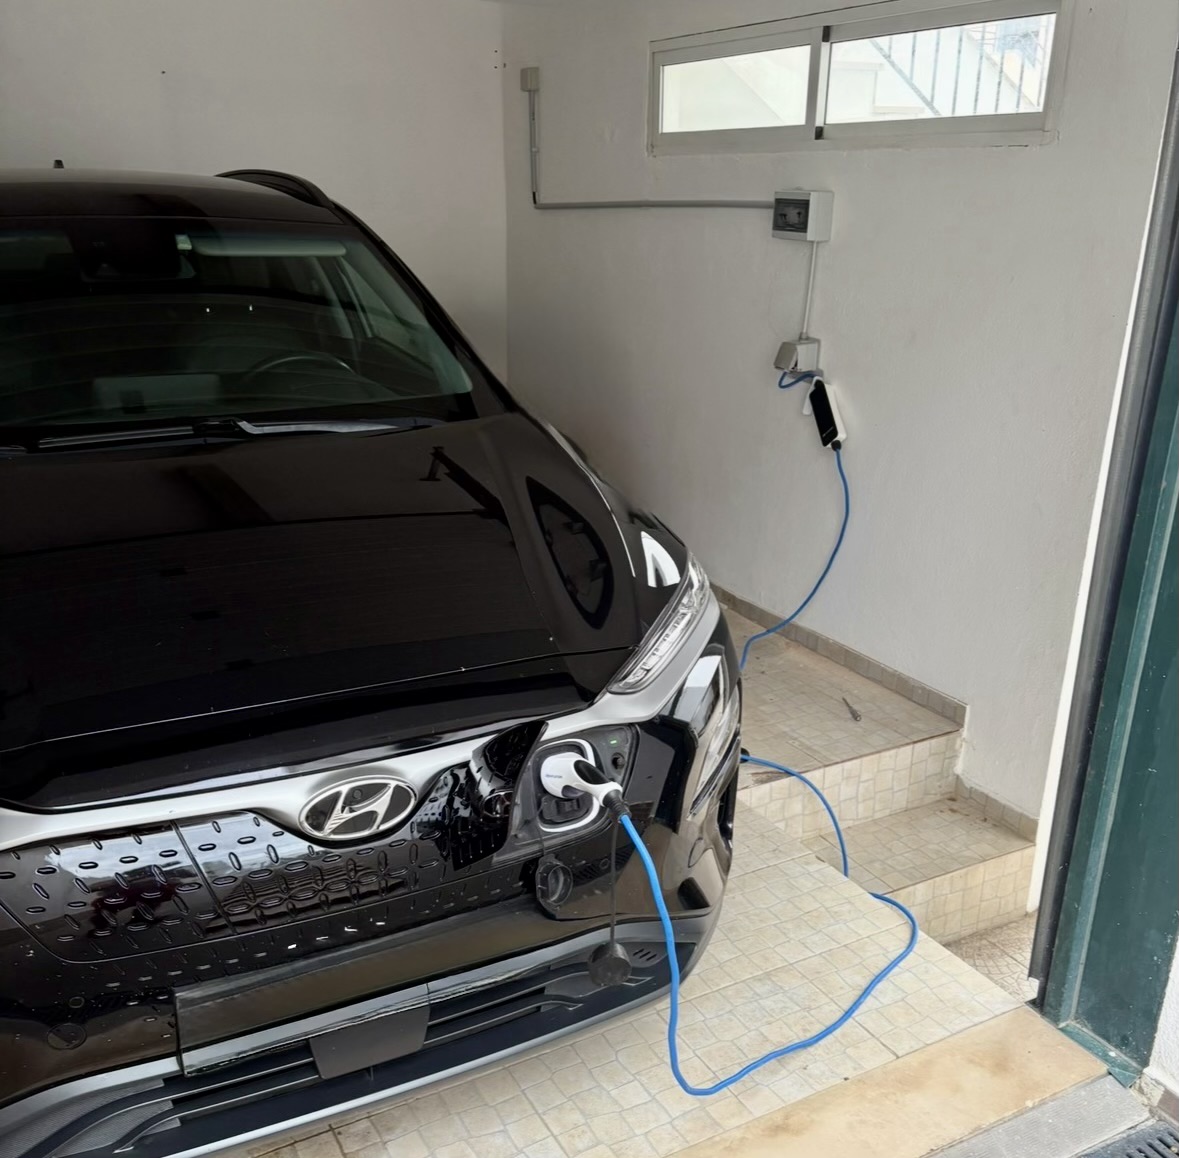
The car in the garage, charging at 12 A from the house's solar surplus.
FieldSummary
Situation3.5 kWp of solar exporting summer surplus with no viable compensation
IdeaUse the 64 kWh battery already in the garage: the electric car
HowLocal controller: Shelly EM → Home Assistant → relay → contactor → charger
ResultCharging on sunshine instead of exporting for free, for ~€260–€445 in parts
Still open6 mA DC electrical protection — a blocking item, explained at the end

The energy that was walking away

I have roughly 3.5 kWp of solar on the roof. On bright days the house cannot consume everything the panels make, and the leftovers go to the grid. In Portugal I have no “virtual battery” on terms that make sense, and selling that surplus would mean contracts and paperwork out of all proportion to a single house.

The classic answer is to buy a home battery. I ran the numbers: an installed 10 kWh system easily reaches the several-thousand-euro range — current European examples can exceed €7,000 — and payback depends on consumption, tariffs, the inverter, degradation and installation. For my profile, the money did not add up.

Then something obvious clicked: the biggest battery in the house was already in the garage. The electric car holds 64 kWh. It does not need to power the house — it only needs to charge when there is too much sun.

The maths, in plain numbers. The portable charger is limited to 12 A, which at 230 V is about 2.76 kW. Taking the car from 20% to 90% is ~44.8 kWh, i.e. some 16 to 18 hours of charging. Since 3.5 kWp rarely runs flat out and the house consumes part of it, that energy is collected in pieces across several sunny days. That matters: the challenge is not power, it is choosing when to switch on.

Why I did not just buy a product

Commercial wallboxes do exactly this, and for many homes they are the right choice. In my case the problem was not the feature — it was fitting it into what I already had.

ObstacleWhat it meant in practice
Closed ecosystemsInverter, meter and charger would all have to speak the same language — or force me to buy yet another meter from the same brand
The house does not cooperateThe main board and the garage are far apart: more cable, holes in walls, trenching and panel changes
Real priceA €500–€800 product becomes a €900–€1,800 or more project once labour is added
One more islandI would end up with another isolated system, when I already ran local automation

So the goal became this: charge the car from the surplus that is actually left over, without replacing the inverter, without replacing the charger, without rebuilding the distribution board — and with the decision happening inside the house, not in somebody's cloud.

To be clear about terms: this does not turn the car into a house battery. The car never sends energy back. It is a smart controller wrapped around a charger that already existed.

The idea in four pieces

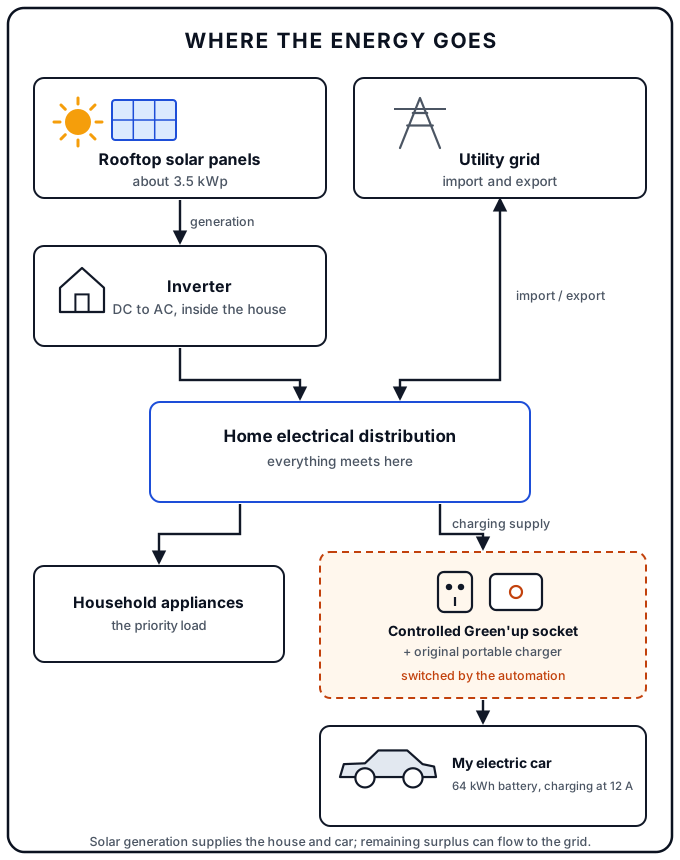
In everyday language, the system does four things: it sees how much energy is spare, decides whether switching on is worth it, switches the charger, and has an electrical protection layer that depends on no software at all. Splitting those four jobs was the best decision in the project: each piece can be tested or replaced on its own.

System architecture: the local control path is solid; optional remote access is dashed.
  • See — a Shelly EM with clamps at the incoming supply measures what enters and leaves the house, second by second.
  • DecideHome Assistant, on a Raspberry Pi 4 with Docker, runs the rules.
  • Switch — a Shelly Plus relay drives the coil of a Schneider contactor, which is what actually carries the current.
  • Protect — a Legrand DX³ RCBO (C16, 30 mA, Type F) on the garage circuit.
  • ExtrasZigbee for the house sensors and a Cloudflare Tunnel to check everything from my phone without opening router ports.

Why measure the grid and not the panels? Because production alone lies. If the panels make 3.2 kW but the house is already using 800 W, only 2.4 kW is spare — switching on a 2.76 kW charger there means instantly buying electricity. The honest signal is what crosses the meter.

Why a contactor if the relay already switches? Because they are different tools. The smart relay is built to command, not to carry hours of heavy current every day. The Schneider Acti9 iCT contactor is built exactly for that. So the “clever” device switches about 1 W and the “dumb” device carries the 2.76 kW. It is the same logic as separating a control panel from a motor.

ChoiceWhyWhat I rejected
Shelly EM as the source of truthMeasures net grid exchange with household consumption already netted off, and integrates locallyReading inverter production only — ignores consumption and causes immediate grid import
Home Assistant on Raspberry Pi 4 / DockerShelly and Zigbee integrations, history, dashboards, automations and local APIsVendor-cloud automation — loses control and creates an internet dependency
Shelly Plus relay on the coil onlySwitches ~1 W instead of ~2.76 kW and stays isolated from the sustained loadRouting charger current through the relay — duty and current outside its intended use
Schneider Acti9 iCT A9C20842 contactorTwo-pole, normally open, 40 A AC-7A: designed for frequent switching of household loadsA generic DIN relay with no declared utilisation category
Legrand DX³ 410753 (C16 + 30 mA Type F)Combines overcurrent and residual-current protection on the garage circuit, with Type F suited to electronic loadsReusing a shared upstream RCD, with no dedicated circuit
Sonoff Zigbee coordinatorGarage Wi-Fi is weak and I did not want dozens of devices congesting the networkEverything on Wi-Fi — worse coverage, more noise, more failure points
Cloudflare Tunnel (free plan)Encrypted outbound connection and an HTTPS address without opening router portsPort forwarding with DDNS — exposed attack surface

One note on remote access: Cloudflare decides nothing. If the tunnel drops, I lose the app while away and charging keeps being decided locally. And like any remote access, it needs strong authentication and regular updates.

The hard part: deciding when to switch on

The naive rule — “if it is exporting, charge” — looks great for about ten minutes. Then a cloud passes, somebody boils a kettle, and the system starts switching the car on and off dozens of times an hour. That is bad for the contactor, bad for the charger and bad for the car.

The fix is the same one used in any control system: hysteresis (different thresholds for on and off), time windows before reacting, and a cooldown between sessions. Instead of reacting to instants, the controller reacts to trends.

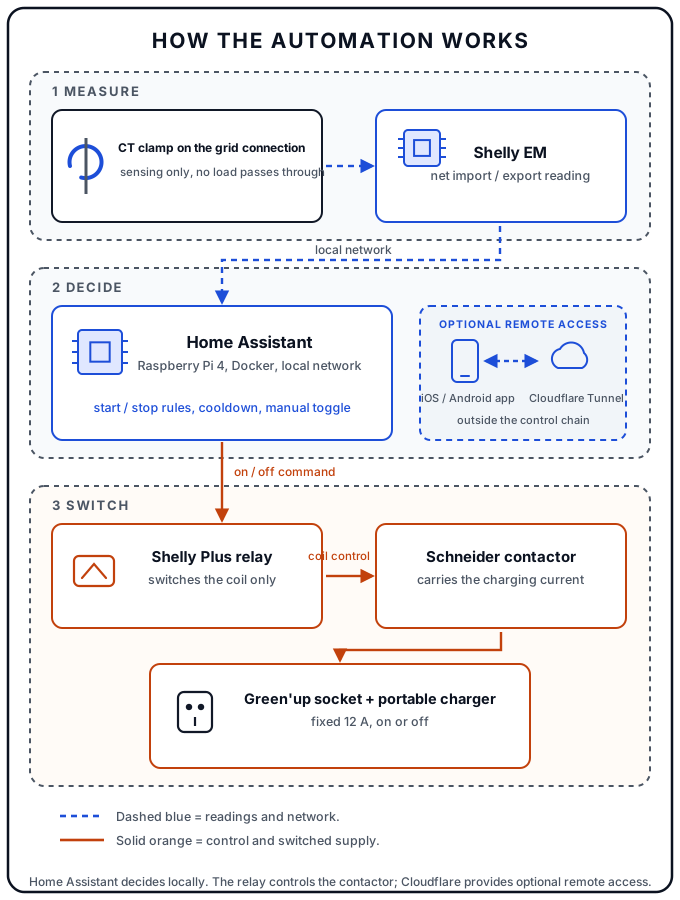
Controller state machine: every uncertain path ends with the contactor open.
  • Start candidate: export ≥ ~2.9 kW for five continuous minutes.
  • Starts if: car plugged in, solar mode on, schedule allows, telemetry fresh, no faults and no active cooldown.
  • Stops if: sustained import above the margin, telemetry goes quiet, manual disable, maximum session length reached or a fault is detected.
  • Cooldown: at least ten minutes before another automatic session.
  • Golden rule: with no trustworthy data, do not charge. Never “assume” there is surplus.

The 2.9 kW figure is just mine: the charger's ~2.76 kW plus a margin. Every house has to tune it to the meter's sign convention, base load, supply voltage, charging losses and the behaviour of the car itself.

How it is actually built

For anyone who wants to reproduce it: the rules live in YAML inside Home Assistant. Entity names depend on your own setup, so read this as intent rather than a copy-paste recipe.

alias: EV - start on sustained solar surplus
triggers:
  - trigger: numeric_state
    entity_id: sensor.grid_export_power
    above: 2900
    for: "00:05:00"
conditions:
  - condition: state
    entity_id: input_boolean.ev_solar_mode
    state: "on"
  - condition: state
    entity_id: binary_sensor.energy_meter_healthy
    state: "on"
  - condition: state
    entity_id: timer.ev_charger_cooldown
    state: "idle"
actions:
  - action: switch.turn_on
    target:
      entity_id: switch.ev_contactor_control
mode: single

And the mirror automation, which cuts out when the house starts importing steadily or the meter stops answering:

alias: EV - stop on grid import or unhealthy telemetry
triggers:
  - trigger: numeric_state
    entity_id: sensor.grid_import_power
    above: 300
    for: "00:02:00"
  - trigger: state
    entity_id: binary_sensor.energy_meter_healthy
    to: "off"
    for: "00:00:30"
actions:
  - action: switch.turn_off
    target:
      entity_id: switch.ev_contactor_control
  - action: timer.start
    target:
      entity_id: timer.ev_charger_cooldown
    data:
      duration: "00:10:00"
mode: single
  • Shelly EM: clamps at the incoming supply, orientation checked against known loads, static IP and local integration (cloud disabled).
  • Raspberry Pi 4: Home Assistant in Docker, auto-start, scheduled backups and a reserved IP on the router.
  • Shelly Plus: updated firmware, output in `switch` mode (not `detached`) and power-on state forced to *off*.
  • Zigbee: Sonoff coordinator on a USB extension, away from the Pi to avoid 2.4 GHz interference.
  • Home Assistant: a solar-mode toggle, a cooldown timer, a telemetry-health sensor and a manual button always visible on the dashboard.

That manual button is not a detail: no automation should take control away from the person standing in the house.

The part software cannot fix

Up to here it is all bits. Underneath there is real current flowing for hours at a time, and that is where honesty matters more than enthusiasm.

Single-line view of the garage branch, with the DC-protection item still open.
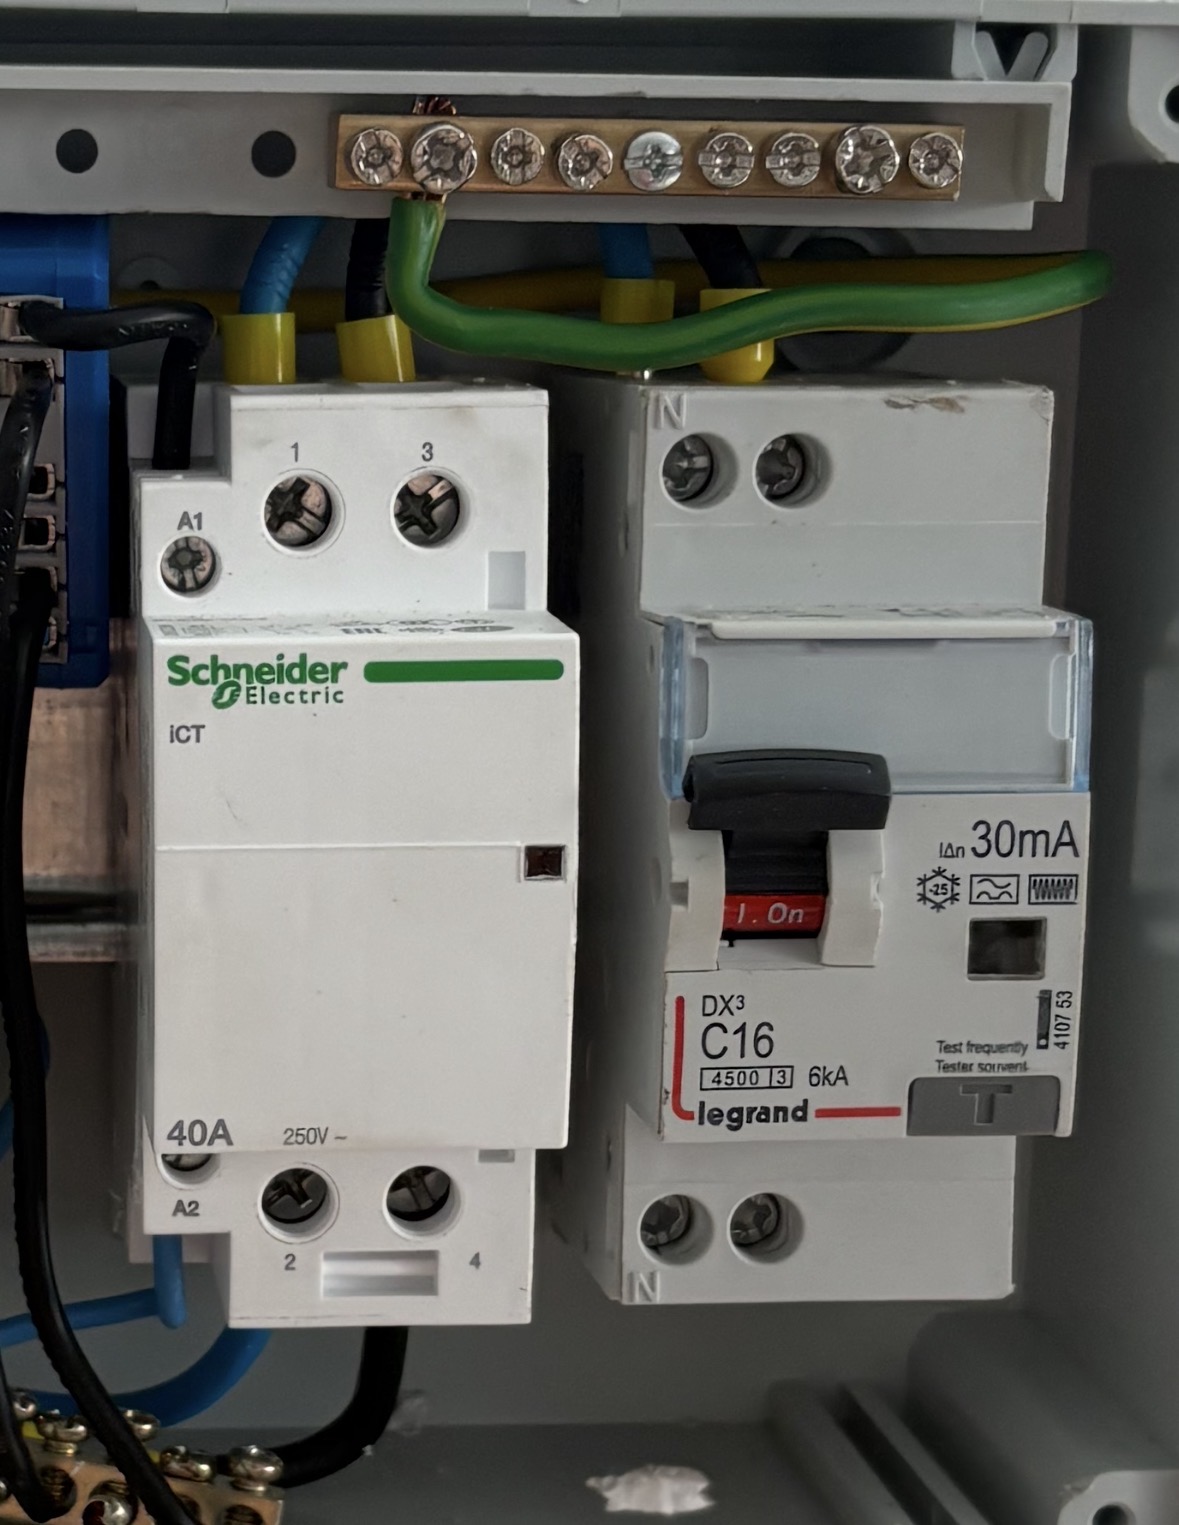
Garage sub-panel: Schneider iCT A9C20842 contactor on the left, Legrand DX³ 410753 C16 / 30 mA Type F RCBO on the right. A photo cannot validate cable sizing, terminal torque, earthing or compliance.
⚠️ Unresolved item: my portable charger does not include 6 mA DC residual-current detection, and a 30 mA Type F RCBO does not cover that on its own. Before continued use, a qualified electrician should specify and test a compliant arrangement — typically a Type B RCD, or Type A/F combined with a 6 mA RDC-DD.
RiskWhat I didStatus
DC residual current from the carNothing; Type F does not cover 6 mA DCOpen — blocking
Switching far too oftenHysteresis, minimum windows and a 10 min cooldownSolved
Wrong or missing dataHealth sensor; no valid data means no chargingSolved
Controller failureThe contactor is normally open and drops out by itselfSolved by design
Remote-access exposureOutbound tunnel, no open ports, strong authenticationSolved
Circuit heatingHard C16 ceiling and a 12 A charger limitNeeds professional verification

A common misunderstanding is worth clearing up: the contactor being marked 40 A does not make the circuit a 40 A circuit. What rules is the C16 breaker, the cable cross-section, its route, ambient temperature, voltage drop, terminals and earthing. Charging a car is a sustained, safety-critical load — the final design must be verified and tested by a professional. This article is an architecture note, not a wiring tutorial.

What it cost

Indicative 2026 retail prices, not my invoices. I reused the Raspberry Pi and the portable charger, so they are excluded from the incremental cost.

ComponentIndicative priceRole
Shelly EM and current clamps€55–€80Seeing what enters and leaves the house
Shelly Plus relay€18–€30Driving the contactor coil
Schneider A9C20842 contactor€35–€65Carrying the charger current
Legrand 410753 RCBO€95–€135C16 and 30 mA Type F; not DC-complete alone
Sonoff Zigbee coordinator€20–€35Reusable local device network
DIN rail, cable, terminals and labels€40–€100Installation materials
Required DC-protection fixProject-specificType B or RDC-DD, with professional design

That is a subtotal of roughly €260–€445, before the DC-protection fix and any labour. A new Raspberry Pi with card and power supply would add ~€90–€140. A commercial solar wallbox plus its meter usually starts several hundred euros higher, and a full installation can reach €900–€1,800 or more. A 10 kWh home battery is another order of magnitude. To be fair: the DIY route is not automatically cheaper once compliant protection, labour and my own time are counted — but it avoided replacing hardware that already worked.

What changed day to day

The prototype took only a few hours to put together, because the hard software already existed: Home Assistant orchestrates, Shelly measures and actuates, the Raspberry Pi runs it all locally, Cloudflare Tunnel gives remote access and Zigbee connects the rest of the house.

  • The car charges when there is spare sun, not at a fixed hour I set by hand.
  • Energy that used to leave for free now stays in the house.
  • I have history: production, consumption and every charging session.
  • The same foundation runs lights, heating, pumps, door sensors, temperature and humidity.
  • Parts cost in the low hundreds, without replacing the inverter or the charger.

But if I have to pick the most important lesson, it is not technical in the glamorous sense: it was recognising the line between a prototype that works and an electrical installation that has been validated. Software optimises energy; it cannot compensate for incomplete residual-current protection. Closing that gap is part of finishing the project — not a footnote.

What comes next

  • Close the blocking DC-protection item, with professional design and testing.
  • Modulate current (6–16 A) instead of on/off, to follow the surplus more closely.
  • Read the car's state of charge to set per-session targets.
  • Alerts when something degrades: telemetry loss, switching failures, energy drift.
Before buying another big battery, look at the flexible loads you already own. Measure first, keep the decision local, separate control from power, write down what should happen when things fail — and treat electrical safety as a requirement, not a closing detail.

Sources and further reading

Wallbox: using solar charging and the required power meterOpenSchneider Electric: EV charging installation design and DC residual-current protectionOpenIET: RCD requirements for electric-vehicle supply equipmentOpenSchneider Electric A9C20842 product characteristicsOpenHome Assistant installation documentationOpenCloudflare Tunnel documentationOpenGoldenergy: overview of virtual batteries in PortugalOpenEuronews Portugal: residential solar-battery cost examplesOpen

*This article describes my project's architecture and lessons learned. It is not professional electrical-installation guidance. EV charging circuits should be designed, installed and tested by a qualified professional.*